SliceOmatic and Python
This means that you need to have Python (and some of the associated modules) installed.
This web page is designed to help you setup Python and the modules you will need to run the AI mode.
GPU acceleration
The cuDNN library need to be installed BEFORE you install the "Tensorflow" module in Python. If they are not present when installing Tensorflow, then Python will install a CPU version of the library instead of the GPU version.
Please note that you do not need GPU acceleration to use the AI modules. But it is the difference between waiting 2 days or 2 hours for the same training to complete... If you are just using the AI with the provided weights (and not doing your own training), then you can easily do without the CUDA card. With a CUDA card, segmenting a 512x512 CT image in the AI mode with pre-defined weights take about 20ms, without a CUDA card you need about 250ms.
CUDA is a programming language used to access the GPU of Nvidia graphic cards.
For the compatible graphic card look at this page: Windows, Cuda or VR problems. You will need a powerful card with a lot of GPU memory. I would suggest something like the GeForce RTX3090.
To install the required libraries, please follow the instructions at: Installing CUDA libraries
Installing Python
|
There are many ways to install Python on Windows. I will describe here how to install
it from either the Official Python.org web site, or from the
Anaconda's web site, your choice. Please note that both installation are equivalent. However, Anaconda now charge a fee if you are part of an institution while the Python.org version is still free. SliceOmatic was compiled with Python rev 3.9, so you need to install the same version on your system. |
Installing Python additional modules
|
O.K. now that Python is installed, we will also need to install 3 additional modules: "NumPy", "TensorFlow" and "Keras". To install these we use the "pip" interface. |
|
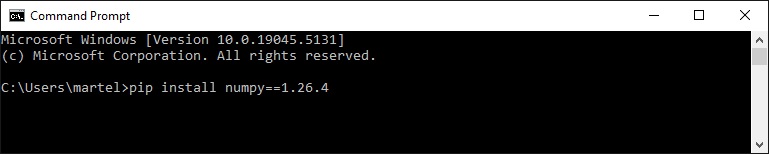
At the prompt type in "pip install numpy==1.26.4" and press "Enter" to install the NumPy library. Note: If you do not have a CUDA card or the CUDA libraries on your system, the Python will install the CPU version of the NumPy libraries. So, if you have a CUDA compatible GPU, it is important to install CUDA before you install NumPy. |
|
|
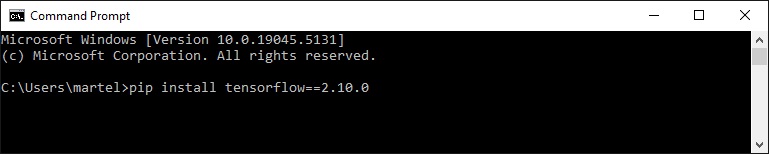
Again, at the prompt type in "pip install tensorflow==2.10.0" to install the tensorflow library. Note: You can not install the later versions. They no longer support Cuda on Windows! |
|
|
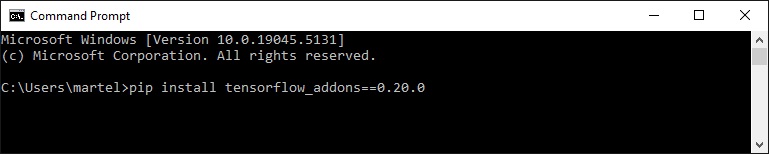
Again, at the prompt type in "pip install tensorflow_addons==0.20.0" to install the tensorflow addons library. |
|
Updating from previous sliceOmatic
|
If you are updating your version of sliceOmatic from a revision prior to rev-10, you need to un-install the older Python libraries before installing the new ones. To un-install these we use the "pip" interface. |
|
At the prompt type in "pip uninstall tensorflow" and press "Enter" to un-install the TensorFlow library. At the prompt type in "pip uninstall numpy" and press "Enter" to un-install the NumPy library. |