These modes are used to segment the images and create the TAG data. Each segmentation technique has its advantages and its inconvenients. When one of these modes is active the 3D tools will not be available. Any window associated with a TAG Mode will be in 2D mode (either Mode ONE or Mode ALL).
There are also a few additional TAG modules available in the sliceOmatic installation file. By default they are not installed, but if you think you may need them, you simply have to install them. The buttons for the additional modes will have a bluish tint.
The default modes are:
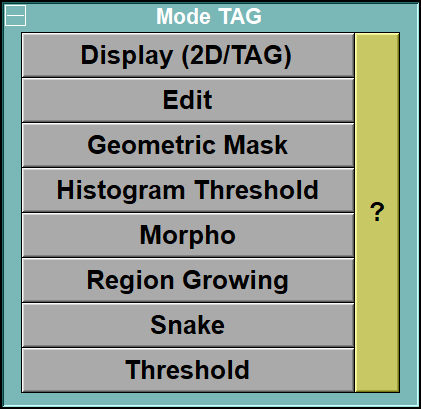
This mode can be used to view 2D frames and enable the use of the 2D and TAG tools while taking a very small space in the Mode's interface, leaving more space for the tools.
•Edit
This is a simple "paint box" that enables to edit the pixels of the TAG images. It is useful to re-touch any small errors that can be left after having used the other segmentation modes.
In this mode you can apply some mathematical morphology operators on the TAG images.
The geometrical masks are useful as post processing. You can use the masks to increase the number of tags present in an image. If, for example, you want to differentiate between left and right organs, you can segment the organs using the same TAG values for left and right and after that create a rectangle mask over the right part of the body and "add" the TAG value associate with the mask to the TAG image to create a different TAG value for the right hand side organs.
The Histogram clipping mode is used to clip an existing TAG value to a specified GLI range.
The Histogram Thresholding mode is used to threshold the images using information extracted from the image's histogram. When the tissues to segment are clearly differentiated in the histogram (such as in the leg) this technique is quite efficient.
The Mathematical Morphology mode is very useful for segmenting some type of images. Any tissue that has a big enough surface and a well defined gradient will be easy to segment with this Module. The main advantage of Morpho is that the segmentation technique is based on the variation of the pixel values (the gradients), not the values themselves. So this makes it ideal for MR images where the pixel values are not uniform over the image. A good example would be sub-cutaneous fat in MR images. It is not very good for segmenting very small regions however, so it would not work well with the visceral fat. If you work with a 3D dataset, Morpho propagates very well from one frame to the next.
The Region Growing Mode is based on thresholding. So it works directly with the pixel values. It has 3 sub-modes: "Paint", "Grow 2D" and "Grow 3D". "Paint" is very useful when you want to threshold only a small region in the image. For example, it is the ideal tool to segment visceral fat. Just select a big brush, fix a threshold that will capture the fat (you can adjust threshold values with the mouse wheel) and "paint" your fat in the abdominal cavity with the brush. "Grow 2D" grow a region starting from the cursor position. All adjacent pixels that fall within the threshold range, and respect the brush constraint, are tagged. "Grow 3D" is similar to the 2D version, but also propagate through all the frames that belong to the same parent in the database tree. Unfortunately, even though the option is present, the Region Growing mode does not propagate well from one frame to the next.
Snakes, also called "Active Contours", work well with tissues that have a smooth well defined contour such as bones in CT. It is also the ideal mode to compute the circumference of the body. Just place a few points outside the body and minimize the curve. You can then transform the snake in a geometry and get the length of the curve from the 3D measurement tool. If you work with a 3D dataset, the Snakes propagate very well from one frame to the next.
The Thresholding Mode applies a global threshold to the complete image. Apart from a few cases in CT images, global thresholding is not the ideal segmentation tool. Since it is global, it tends to tag tissues that should not have been tagged if you work with images containing multiple organs. For simple images, such as CT of the members, it can be very useful. The threshold are based directly on the pixel values, so in CT you can fix your threshold directly on the Houndsfield values. However, for more complex images with multiple organs, you have more control with the Region Growing tool.
The optional modes for this group are:
This mode is used to compute automatic segmentation of 4 tissues on CT images at the L3 level.
This is a variation of the "Histogram Thresholding" module. In this module, the program will try to locate the histogram's peaks automatically and use the values from the detected peaks to segment the images.
This mode is used to import raw segmentation data.
This mode is used to interpolate segmentation results between slices. For example, if you are segmenting legs, it may be efficient to interpolate some slices instead of computing all of them.
This mode enable you to transfer segmentation (the TAGs) from one dataset to another. For example if you have a PET/CT aquisition, you can segment the CT images and then transfer the segmentation results to the PET images.
Note:
|
|
|
From the Display Area
The mouse controls associated with this mode are:
|
|
|
|
|
|
Mouse button |
Function |
|
|
|
|
|
|
Scroll Wheel |
Increase / decrease the magnification of the selected image(s). When changing the magnification, the program will try to keep the same pixel under the cursor. |
From the Keyboard
There are a few keyboard keys that have been mapped to commands that can be used in all the TAG modules.
|
|
|
|
|
|
Key |
Function |
|
|
|
|
|
|
F1 to F4 |
Select display modes "Grey", "Mixed", "Over" or "TAG" |
|
|
Shift "+" / "-" |
Increase / decrease TAG opacity in Display Mode "Mixed" |
|
|
F5 to F10 |
Select brush #1 to #6 |
|
|
"0" to "9" and "Pad 0" to "Pad 9" |
Set the current TAG value to TAG-0 through TAG-9 |
|
|
Pad Period and Pad Delete |
Select the TAG value under the cursor as the current TAG value |
|
|
Enter |
Flood-fill the region under the cursor with the current TAG value |
|
|
Page UP / Page Down |
Change the current frame within its parent |
|
|
Home / End |
Change the current frame by changing the parent |
|
|
Pad Plus / Pad Minus |
Increase / decrease scaling for all selected frames |
|
|
Arrow keys |
Move cursor 1 pixel in any direction |
|
|
Print Screen |
Create a snapshot of the display area |
Technical Note:
|
|
|
From the Command Line
A number of commands affect the tags. These can be found in:
"SliceO_System\Brush.dll" section of Appendix B.
"SliceO_System\Tag.dll" section of Appendix B.
"SliceO_System\Undo.dll" section of Appendix B.