In this mode you can change the composition of the database tree. Presently sliceOmatic support 2 types of "1D" data: The CSV files and the "MR Spectroscopy" data.
MR Spectroscopy datasets are acquired at the same time as 2D MR image files and they are closely linked to these 2D image files. So, the structure used to sort the Spectroscopy files are the same as the 2D images: Study, Series and slice Position.
CSV files on the other hand can be independent from 2D images. All the rows in the CSV datasets are treated independently. They are stored in the "Data" class, the leaf of the 1D class tree. All the other classes in the 1D tree are used to group these data rows. They are grouped using the concept of "Indexes". The classes will mark specific columns to be index columns. If 2 rows from the input files have the same values in their index column, then they are merged in 1 data row.
|
|
|
|
|
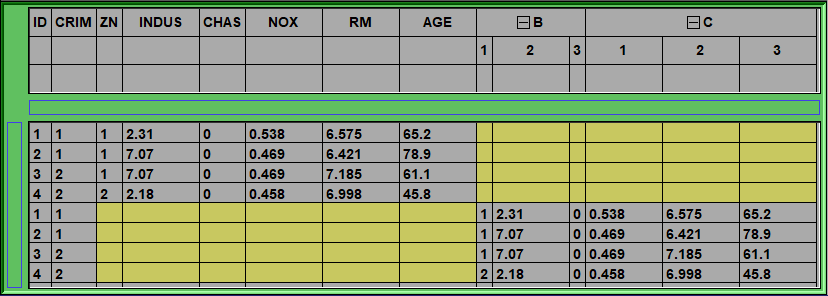
2 CSV files of 4 rows each with only 2 column in common ("ID" and "CRIM")
|
|
|
|
|
|
The same files once the "ID" column has been selected as index |

This mode enable you to manipulate the composition of the 1D database tree by selecting the 1D classes that will be used in the generation of the tree.
The "Study" class define the "Study info, Study ID" column as an index column.
The "Series" class define the "Study info, Series num" column as an index column.
The "Position" class define the "Study info, Slice position" column as an index column.
The "Index" class let the user define one (or more) column as index column(s).
The interface for this mode is similar to the "DB Class Management 2D" mode of "The 2D Modes" section of the manual. The only difference is in the choice of available classes.
From the Graphic Interface
|
|
|
||
|
This list will present all the 1D classes loaded by the program. The buttons for classes that are not part of the basic sliceO package will have a cyan background. The available classes from the basic package are:
|
|||
|
|
|
||
|
|
|
||
|
|
|
||
|
You can click on one of the classes of this list to select it. The selected class can be moved or delete with the interface.
Note:
|
|||
|
Top/Up/Down/Bottom |
These buttons are used to change the order of the classes in the tree. The selected class from the "Active Classes" list can be moved to the top (just after the root class), up one level, down one level or to the bottom (just before the frame class).
|
||
|
Pressing this button will delete the selected class from the "Active Classes" list.
|
|||
|
This window displays the information about the selected class in the "Active Class" list.
|
|||
|
The database tree is recomputed using the classes defined in the "Active Classes" list.
|
|||
Edit |
The "Edit" button open a class edition window. In this window you can see the complete class tree as it stand in the program's memory. You can remove classes and change their connections.
Warning:
Warning:
|

The Edit Interface
|
|
|
|
|
In this window you can see the complete class database tree as it is in the program memory.
From this window you can remove classes from the tree. Pressing the "Delete" key while the cursor is over a class will delete that class instance from the tree. The children of that class (if there are any) will automatically be connected to the parent of the deleted class.
You can also detach and re-attach classes by selecting their "in" circles (the one on the left side of the class box) and dragging it to the "out" circle (on the right side) of another class. The re-attach children will be added to the end of the list of current children if the class already had children. So this technique can also be used to re-sort the children of a class. Clicking on the "out" circle of a class will select the "in" circle of all the children of the class. |

From the Display Area
There is no display area interaction specific to this mode.
From the Keyboard
There is no keyboard interface specific to this mode.
From the Command Line
There are no command lines specific to this mode.