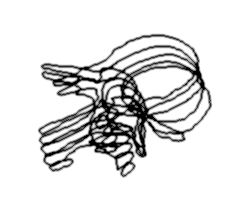
In this mode you can use Active Contour (Snake) curves to segment the TAG images.
A Snake is a curve that will tend to minimize its energy. The energy of a Snake is composed of 2 parts: its internal energy, computed from its shape and curvature, and its external energy, computed from the gradient of the image under the curve.
In this mode you will be able to create Snakes either by placing the Snake’s points directly on the image, or by extracting the contour of existing Tag data to create new Snakes.
From the Graphic Interface
|
|
|
|
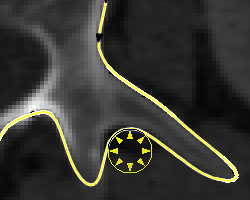
Select the brush used in the Display Area. The brush size gives the minimum radius of the Snake which in turn controls the “smoothness” of the curve. A bigger brush will create a smoother curve, a smaller brush will let the snake “hug” details more closely. This is a local property of the Snake. You can use different brush sizes to create or edit different portions of the Snake. This tool is also described in the "Interface tools" section of the introduction
|
|
|
Select the current Tag value. The “Delete” Tag is used to delete all the Snakes under the cursor. When editing Snakes, only the Snakes associated with this Tag will be affected. This tool is also described in the "Interface tools" section of the introduction
|
|
|
Create a new Snake. The creation mode will remain effective as long as you don’t minimize the Snake’s energy.
|
|
|
Create Snakes from the contours of every Tag surface in every selected image.
|
|
|
The Snake expects either: •a light object on a dark background (+) •a dark object on a light background (-) •the Snake will adapt locally to the highest gradient disregarding its orientation (No Polarity).
|
|
|
Minimize the energy of all the Snakes associated with the current Tag of all the selected images.
|
|
|
Fill out the contours of the Snakes with their Tag colors.
|
|
|
|
|
|
Create a script file that can be used to re-create the Snakes of the current Tag.
|
|
|
Uses the Snakes of the image selected by “slice” as a starting point for the Snakes of an adjacent image. The propagation can be done either on the image immediately preceding (“Up” button) or following (“Down” button) the selected image. Only the Snakes of the currently selected color will be propagated. This tool is also described in the "Interface tools" section of the introduction |

From the Display Area
|
|
Creating a new Snake
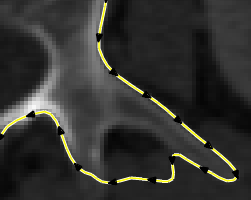
To create a new Snake, you must select a Tag color and a brush. You then press the “Create” button and place points on the image with the left mouse button. The Snake points must form a first approximation of the contour of the object. The order of these points must be clockwise around the object. If you are delimiting a hole in the object, the points must be counter-clockwise. You can move existing points of the new Snake by clicking and dragging the point. You can add a new point between existing points by clicking on the segment joining the points. Otherwise, the points are added at the end of the Snake. The radius of each new point is the radius of the brush. This radius will determine the local radius of curvature of the Snake. |
|
|
Minimizing the Snake’s Energy
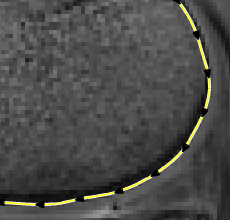
You then click on the “Minimize Snake” button to compute the Snake. The Snake will tend to latch to the regions of maximum gradient in the image that are in the neighborhood of the original curve, while preserving the conditions of local curvature. The middle mouse button can also be used to minimize the energy. |
In "Create New Snake" mode
|
|
|
|
|
|
Mouse button |
Function |
|
|
|
|
|
|
Left |
Insert (or drag) a control point. |
|
|
Right |
Erase your modifications. |
|
|
middle |
Minimize the current snake energy. |
Editing the Snake

At anytime, you can edit the Snake’s curve. The left mouse button is used to push the curve away from the cursor, while the right mouse button will attract the curve toward the center of the cursor. All the points on the curve touched by the cursor, either by pushing or pulling, will also have their radius attribute changed to the current brush radius.  You may want to decrease the radius of a section of the curve to hug details more closely, or inversely, you can locally increase the radius to smooth out a section of the curve.

Not in "Create New Snake" mode
|
|
|
|
|
|
Mouse button |
Function |
|
|
|
|
|
|
Left |
Edit the curve by pushing the points. |
|
|
Right |
Edit the curve by dragging the points toward the brush's center. |
|
|
middle |
Minimize the current snake energy. |
Following the correct gradient
When the object you want to Tag is composed of higher value pixels than the surrounding background, the gradient of the pixels on the border of the object will point away from the Snake curve. SliceOmatic uses this information to help the Snake latch to the correct gradient. If, however, the intensities of the pixel are reversed (dark objects on a light background), you must tell it to the program. This is done with the “Polarity” buttons.


Deleting Snakes
You can delete a curve by pressing the “Delete” key while the cursor is over the curve, or you can select the “Delete” button and delete the curve by pressing the left mouse key while the cursor is over the curve.
From the Keyboard
The following keyboard key can be used while in this module:
|
|
|
|
|
|
Key Map |
Action |
|
|
|
|
|
|
Delete |
Delete the Snake under the cursor. |
From the Command Line
text commands recognized in this module:
Snake: [t_frame] t_tag Radius value
Assign the radius "value" to all the points of all the Snakes associated with the Tag matching the "t_tag" template on the frames matching the "t_frame" template.
Snake: [t_frame] t_tag Capture value
Assign the capture range "value" to all the Snakes associated with the Tag matching the "t_tag" template on the frames matching the "t_frame" template. The capture range determines how much the Snake can move to latch on the best gradient.
Snake: [t_frame] t_tag Delete value
Delete all the Snakes associated with the Tag matching the "t_tag" template on the frames matching the "t_frame" template.
Snake: [t_frame] t_tag Save file_name
Create a script file to re-create all the snakes matching the tags in the template "t_tag" from the frames matching the template "t_frame".
Snake: t_frame t_tag Create nb_pts radius capture
Create a new snakes on the frame matching "t_frame" for the tag matching t_tag. This new snake will have nb_pts points with a default radius of "radius" and a default capture range of "capture". The points for the snake will be given by a series of "snake: point" commands.
Snake: Point id x y radius
Add a point to a newly created snake.
Snake: Propagate [up|down]
Propagate the result from the current frame to the next frame in the group, either up (the default) or down.
Snake: Tag
Perform the "Snake to Tag" operation on the snake matching the selected TAG value.
Snake: Geom
Perform the "Snake to Geom" operation on the snake matching the selected TAG value.
|
|
|
Technical Note:
|
|
|