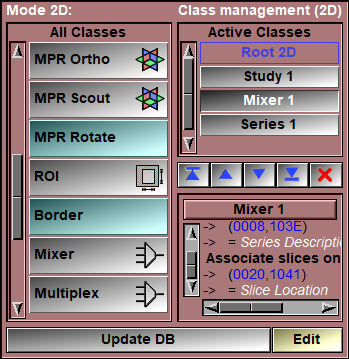
In this mode you can change the composition of the database tree. There are 3 database trees. One each for 1D, 2D and 3D objects. The 1D objects are spectroscopy data, the 2D are images and the 3D are polygon geometries.
This mode enable you to manipulate the composition of the 2D database tree by selecting the 2D classes that will be used in the generation of the tree.
In the "All Classes" list, you have buttons for the available classes that you can use to compose the database tree. Classes from sliceOmatic basic package have a grey button, while classes imported from the "Additional Modules" section of the Web download pages have a cyan button.
For example, the default 2D tree is composed of the Root, Study, Series and Frame classes. When you read an image in the program, it will automatically be inserted in the tree. If the image is part of a new study, then a study class will be created and inserted as a child of the root. If the image is also part of a new series, then a series class will be created and inserted as a child of the study class. And finally a frame class will be created for the image and inserted as a child of the series class. Pressing the "Edit" button will show you the complete tree as it exist in the program's memory.
From the Graphic Interface
|
|
|
|||
|
This list will present all the 2D classes loaded by the program. The buttons for classes that are not part of the basic sliceO package will have a cyan background. The available classes from the basic package are:
|
||||
|
|
|
|||
|
|
|
|||
|
|
|
|||
|
|
|
|||
|
|
|
|||
|
|
|
|||
|
|
|
|||
|
|
|
|||
|
|
|
|||
|
|
|
|||
|
|
|
|||
|
|
|
|||
|
|
|
|||
|
|
|
|||
|
|
You can also install additional 2D classes from the installation script. |
|||
|
|
|
|||
|
|
|
|||
|
|
|
|||
|
|
|
|||
|
|
|
|||
|
You can click on one of the classes of this list to select it. The selected class can be moved or delete with the interface.
Note:
|
||||
|
Top/Up/Down/Bottom |
These buttons are used to change the order of the classes in the tree. The selected class from the "Active Classes" list can be moved to the top (just after the root class), up one level, down one level or to the bottom (just before the frame class).
|
|||
|
Pressing this button will delete the selected class from the "Active Classes" list.
|
||||
|
This window displays the information about the selected class in the "Active Class" list.
|
||||
|
The database tree is recomputed using the classes defined in the "Active Classes" list.
|
||||
|
Edit |
The "Edit" button open a class edition window. In this window you can see the complete class tree as it stand in the program's memory. You can remove classes and change their connections.
Warning:
Warning:
|
The Edit Interface
|
|
|
|
|
In this window you can see the complete class database tree as it is in the program memory.
From this window you can remove classes from the tree. Pressing the "Delete" key while the cursor is over a class will delete that class instance from the tree. The children of that class (if there are any) will automatically be connected to the parent of the deleted class.
You can also detach and re-attach classes by selecting their "in" circles (the one on the left side of the class box) and dragging it to the "out" circle (on the right side) of another class. The re-attach children will be added to the end of the list of current children if the class already had children. So this technique can also be used to re-sort the children of a class. Clicking on the "out" circle of a class will select the "in" circle of all the children of the class. |
From the Display Area
There is no display area interaction specific to this mode.
From the Keyboard
There is no keyboard interface specific to this mode.
From the Command Line
There are no command lines specific to this mode.

