In this step you will assign a specific tag to the different tissues on the slice selected in the previous step.
|
|
|
|
|
|
|
Untagged CT Scan |
|
Tagged CT Scan |
/segment_3a.png)
/segment_3b.png)
The Interface:
In this step, sliceOmatic is placed in Mode "Region Growing".
Only one image window is displayed and it is in "Mode One".
The "Color Scheme" tool is open.
The "TAG Lock" tool is open.
In the Region Growing module, 5 tissues, along with their threshold values, have been pre-defined:
|
|
Tissue |
TAG Name |
TAG Color |
Lower threshold limit |
Upper threshold limit |
|
|
Skeletal muscle |
Muscle |
Red |
-29 |
150 |
|
|
Inter-muscular adipose tissue |
IMAT |
Green |
-190 |
-30 |
|
|
Visceral adipose tissue |
VAT |
Yellow |
-150 |
-50 |
|
|
Subcutaneous adipose tissue |
SAT |
Cyan |
-190 |
-30 |
|
|
Bone (for ABACS+ only) |
Bone |
White |
250 |
2000 |
Note:
|
|
If the vertical resolution of your screen is inferior to 1000 pixels, it is possible that sliceOmatic can not display both the Region Growing interface and the desired tools. If this is the case you will get a warning message in the text window.
You can fix this by either decreasing the size of the interface tools in the configuration interface, or selecting to have floating menus in the same interface. |
|
/warning_size.png)
What to do:
|
|
Using the region growing mode, either the "Paint" or "Grow" sub-modes, you will have to tag the 4 desired tissues. You can follow the links bellow for more information on the segmentation of each of these:
1.Muscle 2.IMAT 3.VAT 4.SAT
Tips for starting •Generally, tissues on the CT scans are analyzed in the following order: oSkeletal Muscle oIntermuscular Adipose Tissue (IMAT) oVisceral Adipose Tissue (VAT) oSubcutaneous Adipose Tissue (SAT)
•After each individual tissue is analyzed, use the TAG lock function to lock the color (TAG) before using a different color to analyze the next tissue
There are 2 methods to color (or tag) CT images using the Region Growing Mode: •Paint. (The most common method) •Grow 2D. (Can be used in some scans for VAT and SAT analysis, but does not work well for muscle analysis)
|
|
/region_growing.png)
|
|
Paint:
With the Paint method, the mouse is used to threshold the pixels under the brush. In this method, it is advantageous to use a big brush. When the cursor is moved over the image, a preview of the pixels that would be affected by the paint operation is showed in magenta.
To add color with the paintbrush:
•Choose the desired TAG color and left click with the mouse and drag over the desired areas on the CT image.
To erase color with the paintbrush (2 methods):
•Method 1: Select the TAG color to erase and right click with the mouse and drag over the desired areas.
The erase operation actually bring back a previous value of the pixel from a "load" buffer. By default this buffer is the generated when you enter the Region Growing mode, but it can also manually be overwritten from the current tag values by pressing the "load" button.
•Method 2: Select the TAG “None” paint over the color to remove using the left click. This will erase all colors that are not TAG locked. |
|
/mode_region_paint.png)
|
|
Grow 2D:
This method allows a large area to be flooded with a TAG color without having to individually paint each pixel. All the pixels connected to the pixel under the brush that fall withing the threshold values will be tagged.
It is most effective for SAT and VAT analysis when there are large amounts of those tissues present. It does not work well on scans with little VAT or SAT or where tissues are packed closely together. It is not very effective for muscle analysis.
The region growing algorithm is constrained by the size of the brush: It will not grow through a bottle neck smaller than the brush. So in this method, it is advantageous to use a small brush.
To add and remove color with the paintbrush:
As with the Paint method, the left click add the TAG color, while the right click bring back the color from the "load" buffer.
|
|
/mode_region_grow.png)
Note:
|
|
SliceOmatic keep track of your last 20 brush strokes. You can undo your last brush strokes with the "undo" button in the region growing interface, from the Undo/Redo menu or by pressing the "Ctrl Z" keys. You can also redo brush strokes that where undone with the Undo/Redo menu or by pressing the "Ctrl Y" keys. |
The TAG Lock tool:
|
|
After finishing analysis with a specific TAG color, use the TAG Lock tool to protect it. This tool allows colors already used to be locked so they are not overwritten when new colors with overlapping HU values are used.
To lock or unlock a color, in the TAG Lock box, click on the color that needs to be locked or unlocked. If the box has a yellow indicator, that TAG is locked |
|
/tag_lock.png)
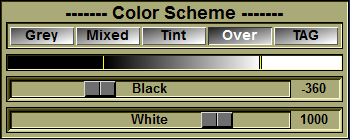
The Color Scheme tool:
|
|
By default, in this step the TAG colors are displayed using the "mixed" model (both the grey level values and the color are added together).
You can change way the TAG colors are displayed on the images with the "Color Scheme" tool interface. Or, you can also use the pre-defined keyboard shortcuts: oF1 = Grey oF2 = Mixed oF3 = Tint oF4 = Over
You can also use this tool's interface to change the brightness and contrast of the grey level images with the "black" and "white" sliders. |
|
|
|
|
|
|
|
|
|
F1 (Grey) For analyzing boundaries between muscle and organs
|
F2 (Mixed) Usually used for the actual process of colouring/tagging tissues
|
F3 (Tint) Good for checking errors and/or out of place pixels |
F4 (Over) Used for presentations |
|
|
Warning: Even though they are not visible, you can still edit the TAG values in this mode |
Note: With F2 and F3, you can change the color opacity with the "shift +" and "Shift -" keys.
|
|
|
/scheme_f1.png)
/scheme%20f2.png)
/scheme%20f3.png)
/scheme_f4.png)
Changing the threshold values:
|
|
By default, the threshold values for the 4 named tissues are set and locked.
|
|
|
|
Once a slider is unlocked, you can change its value directly with the mouse, or if the cursor is over the slider: •The left / right arrows to change by 1. •The "Page Up" / "Page Down" keys to change by 1. •The "Home" / "End" keys to change by 10. •The "Insert" / "Delete" keys to change by 100. •Or you can use the mouse wheel to change by 1. (Unless you also have a mouse key pressed, in which case the value is changed by 10/100 or 1000 depending on the number of key pressed.)
|
|
|
|
You can also enabled the "Mouse wheel" option to use the mouse wheel while the cursor is over the image window to change the threshold values. Each click of the mouse wheel will increment/decrement the selected value by 1. (Unless you also have a mouse key pressed, in which case the value is changed by 10/100 or 1000 depending on the number of key pressed.) |
|
/region_growing_2.png)
/key_homeend.png)
Other useful tools:
The Tools drop down menu also contains many other useful tools when analyzing CT images using the Region Growing mode:
|
|
2D Frame Selection: used to scroll between images and change their size on the computer screen
Note: You can also decrease/increase the size of the images with the "+" and "-" key.
|
|
|
|
2D Blow Up: displays a magnified grid of the area under the cursor |
|
|
|
2D Pixel Info: shows different informations (among these, the GLI value, in HU) for the pixel under the cursor.
|
|
|
|
2D Overlay: used to determine the type of text information is presented on the images.
This tool is used to access information from the DICOM files, such as: •Patient Name •CT date •Slice thickness •Series and image numbers
It can be used to help anonymize images for publications, presentations, or posters. There are 4 buttons for the different options. |
|
/tool_frame_select.png)
/blow_up.png)
/tool_overlay.png)