With this tool, you can place points on the 2D images. Points will be created under the cursor either with the left mouse button, or when you press the “Insert” key of the keyboard. Alternatively, pressing the right mouse button, or the “Delete” key of the keyboard will delete the point under the cursor (or the closest point if none is under the cursor). You can also use the mouse to drag a point.

The points are created in 3D space using the image’s origin, orientation and the pixel dimensions. The list of created points is shared between the Basic Module’s Point mode and the 3D Module’s Point mode. Points created on the 2D images will be visible in the 3D space and inversely, points created on the 3D surfaces will be visible on the 2D images.
Points can also be read from a file or manipulated from the command line.
From the Graphic Interface
|
|
|
|
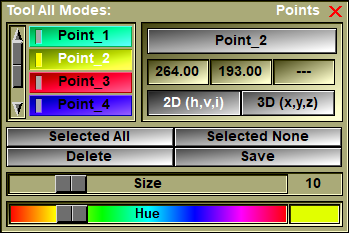
This is a list of all the Points. You can select the points you want to modify from this list. The indicator’s light of the selected points is turned ON. The button of the last point to have been selected or unselected will appear pressed. It is the current point. Information on the current point will be displayed in the box at the right of the list. You can modify the position and name of the Current point from the controls in this box.
|
|
|
You can edit the name of a point by clicking on its name button. The button will be replaced by a text input window. Type in the new name and press "enter".
|
|
|
The 3D coordinates of the current point will be displayed here. Clicking in these boxes will enable you to modify their values from the keyboard.
|
|
|
Select all the points from the list
|
|
|
De-select All |
De-select all the points from the list
|
|
Delete all the selected points
|
|
|
Save all the selected points in a script file. A Save dialog box will appear. For each of the selected points, the following entries will be written in the file: Point: "name" create x y z Point: "name" color R G B Point: "name" size val
|
|
|
This slider is used to control the size of the selected points’ graphic representation. At a size of zero (left) the point will be represented as a 2-pixels-wide point on the screen. At larger sides, a shaded sphere will be used to display the point.
|
|
|
Upon creation, the points are assigned a random color. Afterward, using the Color Editor, you can change the color of all selected points. |
From the Display Area
Points will be created under the cursor with the left mouse button, and deleted with the right mouse button. You can also use the mouse to drag a point.
From the Keyboard
The following keys can also be used while the cursor is over a frame:
|
|
|
|
|
|
Key |
Action |
|
|
|
|
|
|
Del |
Delete the nearest point |
From the Command Line
System Variables defined in this tool:
|
|
$POINT_NB |
(U32) |
Total number of points. |
|
|
$POINT_ON |
(U8) |
Bit field to select which class of points are visible. |
|
|
$POINT_LABEL |
(U8) |
The labels are visible (=1) or not (=0). (Default = 1) |
|
|
$POINT_CUR |
(P) |
Pointer to the current point |
|
|
$POINT_PT |
(P) |
Array of pointers to the points. |
Text commands defined in this tool:
Point: Label (on|off|toggle)
Make the point's label visible or not.
Point: t_point Color R G B
Change the color of the points matching the template t_point.
Point: t_point Delete
Delete the points matching the template t_point.
Point: t_point Position x y z
Change the position (3D) of the points matching the template t_point.
Point: t_point Size value
Change the size of the points matching the template t_point.
Point: t_point Save file_name
Save the points matching the template t_point to a script file.
|
|
|