The Automation tool
This tool enable you to automate some actions. It can be used to read files and perform scripts for each files, or perform scripts for each frames, or simply perform scripts a number of times. For example it can be used to take one snapshot of each frames. Or to create an animation of a 3D object rotating, or in an industrial setting, automate the analysis of images acquire from a continuous process.
When the button "start" is pressed, the tool will execute a number of loops. For each of these depending on the other parameters, it will read a file (if a "Watched dir" has been selected) and/or execute a script (if a script has been specified). You can control how many loops are executed with the "Stop when" parameter. If the parameter is "never" then the loop will not stop until the "stop" button is pressed. If that parameter is a counter, then the loop will be executed a finite number of times, if it is until the last frame is reached, then the loop will also skip to the next frame after each loop and it will stop after the last frame has been reached. If the parameter is until the last file is reached, then the loop will be executed once for each file in the watched dir directory.
The tool also has 2 variables that can help control its actions:
$AUTOMATION_FILE_MAX
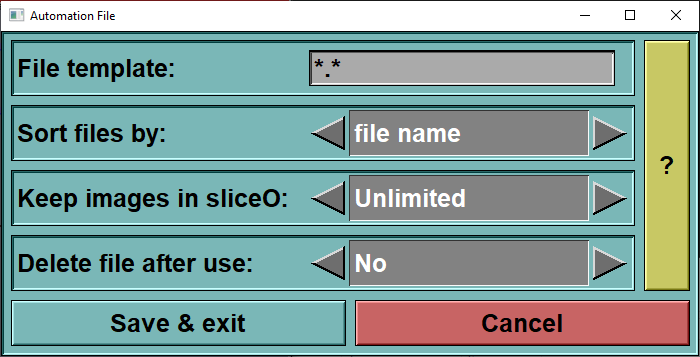
By default this variable is set to 0 (0 = no limits). But if you change that, then it control the maximum number of files that are open at the same time in sliceO. When the loop open a new file, it will also close older files to respect that condition.
$AUTOMATION_FILE_DELETE
By default this variable is set to 0. If you set it to any other values, then the loop will automatically delete any files it read from the "Watched dir" directory after it has been read.
These 2 variables can also be set form the "File/More Options" interface.
From the Graphic Interface
|
Sub-Modes |
The Automation tool has 4 sub modes: Main, File, Script and Start.
|
|
In this sub-mode you set a few of the basic parameters of the tool.
|
||
|
|
|
|
|
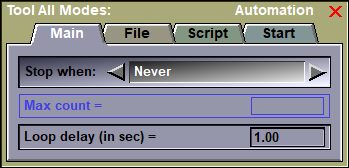
Stop when |
The tool will execute its loop until this condition is met. The choices are: •Never: With this option, once started the loop only stop when you press the "stop" button. It can be used to animate a 3D object or to automate an industrial process (see examples). •Last frame in group. With this option, the loop will advance one frame each iteration. It will stop once the last frame in the current group is reached. For example, if your classes are "Study" and "Series", it will loop for all the frames in the current series and stop. •Last frame in DB. With this option, the loop will advance one frame each iteration. It will stop once the last frame in the database is reached. For example, if your classes are "Study" and "Series", it will loop for all the frames in the current series, then go to the next series/study until the last frame of the database and then stop. •Max count is reached. A counter is incremented for each loop and the process stop when a maximum number of iterations is reached. The loop counter can be reseted by pressing the "Reset" button. •Last file in watched dir. The process will read one file from the "Watched dir" directory each iteration until there are no new files to read (the program keep a list of the files it has already processed).
Note
|
|
|
Max count |
This option is enabled if the Stop condition is "Max count is reached". Then you can enter the maximum count value. Each iteration of the loop increment the "count" value. This value can also be modified by directly changing the variable $AUTOMATION_LOOP_MAX.
|
|
|
Loop delay |
This delay is applied at the beginning of each loop to slow the process. This can also be modified by directly changing the variable $AUTOMATION_LOOP_DELAY. Some operations (such as propagates) are done in a background thread, if we do not slow the iterations enough to give these thread time to complete, the automation will behave erratically.
|
|
|
|
|
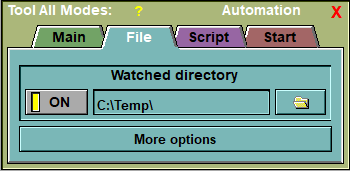
In this sub-mode you can specify a directory that the process will query for files.
|
||||||||||||||
|
|
|
|||||||||||||
|
Watched dir |
The tool will read files from this directory if it is ON. Each iteration of the loop, a new file will be read. The order in which the files are read is controlled by the "Dir sort" parameter. The tool remember the last file read and will read the files sequentially in the desired order. If you press the "Reset" button, then it will re-start from the first file in the sort order.
|
|||||||||||||
|
More Options
|
This button will open a new window.
Note
|
|
|
|
|
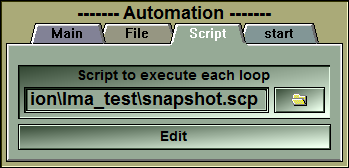
In this sub-mode you can specify a script that will be executed each loop.
|
|
|
|
|
|
Script |
The tool will execute this script for each loop.
|
|
Edit |
This button will open the script file in notepad.
|
|
|
|
|
In this sub-mode you can
|
|
|
|
|
|
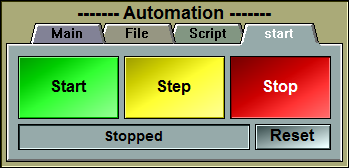
Start |
Start the process. The tool will loop until the stop condition is reached or the user press the "stop" button.
|
|
Step |
Execute one iteration of the loop and stop.
|
|
Stop |
Stop the execution of the loops.
|
|
Status |
Feedback on the current status of the tool.
|
|
Reset |
Reset the "count" value and erase the information about the current file.
|
Example of usages:
Taking a "snapshot" of each frame.
If you want to take a "snapshot" of each of the frames in your database:
•First you make sure the first frame of the database is the current frame.
•Then you go in "Mode One" where only one frame is visible in the display window.
•From the "2D Frame Selection" tool, click the "1" button to make sure that all the pixels of the frame are visible and that they are not enlarged.
•Resize sliceOmatic so that the frame fit in the display window. (the "snapshot tool" grab the window, not the frame).
•From the "Snapshot" tool, select the image format you want for your snapshots.
•Open the "Automation" tool.
•From the "Main" page we select the "stop when" option: "Last frame in DB".
•From the Script page we select a script file, for example: "c:\temp\snapshot.scp".
•We edit that script so that it contain the line: "snap: 1 click" (this will create a snapshot of the window #1 for each iteration)..
•Then from the "Start" page we click "Start".
Animating a 3D window.
If you want to take have an object continuously rotate in a 3D window:
•setup your 3D window with the object you want to see.
•Open the "Automation" tool.
•From the "Main" page we select the "stop when" option: "never".
•Decrease the delay to make the animation smoother (you can input "0")
•From the Script page we select a script file, for example: "c:\temp\rotate.scp".
•We edit that script so that it contain the line: "transform: 1 rotate 0 1 0" (this will rotate the window #1 1 degree along the "y" axis each iteration).
•Then from the "Start" page we click "Start".
Propagating 5 slices at a time.
If your frames are close enough together, you may want to propagate multiple frames at once to speed things up.
In the "Morpho" mode, tag the first frame you want to process.
•Open the "Automation" tool.
•From the "Main" page we select the "stop when" option: "Max count is reached".
•Set the "Max count" parameter to "5".
•From the Script page we select a script file, for example: "c:\temp\propagate.scp".
•We edit that script so that it contain the line: "morpho: propagate".
•Then from the "Start" page we click "Start" to propagate 5 frames.
•Click the reset button.
•Click start again for the next 5 frames...
Analyzing images that are produced continuously.
In industrial settings, we may have a process that is monitored by an image acquisition device. That device will write the images in a target directory and we want sliceO to analyze them.
•We want the files to be analyzed in the order they come in, so we will need to use the "Unsorted" class to make sure sliceO does not try to reorder them.
•Make sure the "Unsorted Class" found in the "User Modules" of the sliceOmatic download page has been installed.
•From the "DB Class Management" mode, remove the default "Study" and "Series" classes.
•Select the "Unsorted" class.
•Press "Update DB".
•Open the "Automation" tool.
•From the "Main" page we select the "stop when" option: "never".
•From the text window type in the command: "$AUTOMATION_FILE_DELETE = 1" to insure that files do not accumulate in the watched directory.
•From the text window type in the command: "$AUTOMATION_FILE_MAX = 1" to insure that files do not accumulate in sliceOmatic. (only 1 frames will be kept). If you accumulate more than one frame and use the "Results" tool to save numerical values, since that tool create one line of results for each open file, you will get duplicate results lines. Keeping only one frame open will get you only one line of results for each file analyzed.
•Make sure the delay is long enough for your computations to take place.
•From the "File" tab select the directory where the files will be.
•From the Script page we select a script file, for example: "c:\temp\process.scp".
•We edit that script so that it contain the commands that you want.
•Then from the "Start" page we click "Start".
From the Display Area
You can change the file's selection by selecting classes and frames from the display area.
From the Keyboard
There is no keyboard interface specific to this tool.
From the Command Line
System Variables defined in this tool:
|
|
$AUTOMATION_FILE_MAX |
(I32) |
By default this variable is set to 0. But if you change that, then it control the maximum number of files that are open at the same time in sliceO. When the loop open a new file, it will also close older files to respect that condition. |
|
|
$AUTOMATION_FILE_DELETE |
(I32) |
By default this variable is set to 0. If you set it to any other values, then the loop will automatically delete any files it read from the "Watched dir" directory after it has been read. |
|
|
$AUTOMATION_LOOP_COUNTER |
(I32) |
Current value of the loop counter |
|
|
$AUTOMATION_LOOP_MAX |
(I32) |
Maximum value of the loop counter |
|
|
$AUTOMATION_LOOP_DELAY |
(F32) |
Watch dir querry delay (in sec) |
Text commands defined in this tool:
Auto: page (main|file|script|start)
Change the current page displayed.
Auto: stop (never|group|db|count|file)
Change the stop condition of the loop.
Auto: max value
Change the maximum number of loop in the "Count" mode.
Auto: delay value
Change the wait delay between each loop.
Auto: file dir dir_name
Set the directory where the files are taken in mode "file"
Auto: file sort (name|date|num|pos)
Set the order the files are visited in mode "file"
Auto: file delete (on|off)
if "on", the files are deleted after being visited in mode "file".
Auto: reset
Reset the loop counter in mode "count".
Auto: script file_name