In this mode, you can use an AI to analyse 1D CSV datafiles (Comma Separated Values) files.
Note:
|
|
|

From the Graphic Interface
|
|
|
|
|
||
|
|
The main "AI with Python" interface has 3 tabs: Train, Test and Predict. Each of theses has a "Config" button that will open the configuration menu, and one (or more) "Compute" button that will open the appropriate page. |
||||


The Configuration Menu
Each of the 3 main pages of the "AI Python" interface has a "Config" button. This will open the configuration menu. Depending on the main pages you are in, the configuration menu will have between 3 and 6 sub-pages. For training, you need access to all the pages, for "Predict", you only need 3.
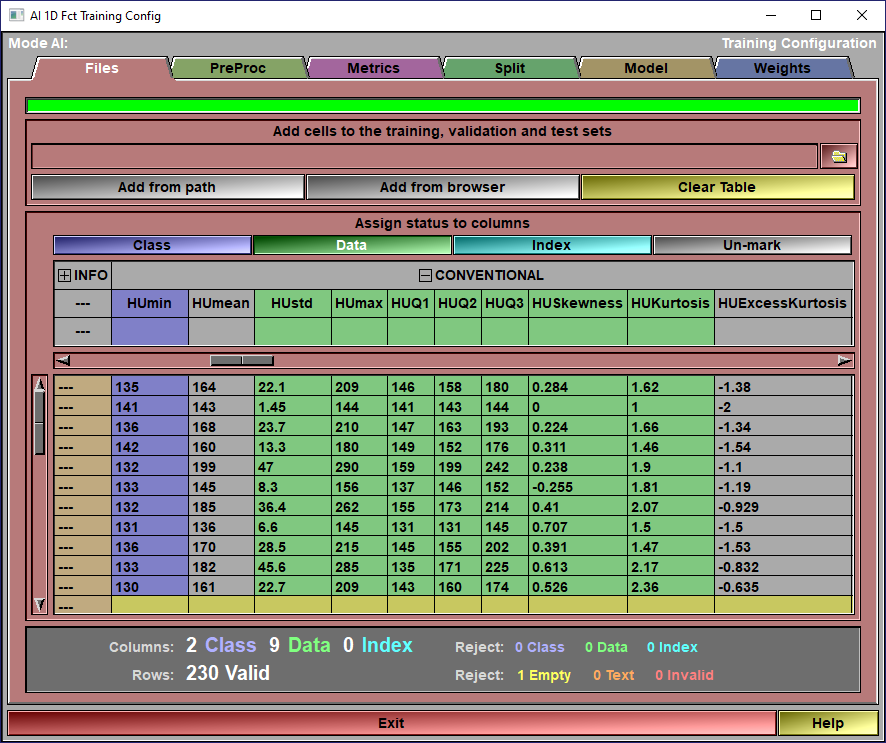
The config "File" page
This page is used to specify the datasets that will be used either for training or testing your AI.
The data must come from CSV (Comma Separated Values) files. These files contain tables of data with a 1 to 3 lines header. SliceOmatic expect these files to have either the ".csv" or ".txt" extensions. The files can be in ASCII or one of 3 UTF encoding (8, 16 or 32 bits). If the files start with the text "sep=", then the next character is used as cell separator, otherwise the program will guess the separator by analyzing the files. (accepted values are ",", "tab" or "space").
If the files contain 3 lines of header (files created by sliceO do), they will be used to create the header and its hierarchy. If only one line is used, each column header will be split in its components and analyzed to create the hierarchy.
The header and data will be presented using colors:
|
|
|
Normal data is presented on a grey background. |
|
|
|
Empty cells are presented in yellow. |
|
|
|
Cells that contain an invalid (Not a Number) value have a red background. |
|
|
|
Cells that contain multiple values have a red background. |
|
|
|
Cells that contain text have a brown background. |
|
|
|
Index columns have a cyan background. |
|
|
|
Data columns (in AI modes) have a green background. |
|
|
|
Class columns (in AI modes) have a blue background. |
Also, if all the data associated with a column are either empty, "NaN", "Multiple" or have all the same value, then that column can not be used by the AI and the background of the associated 3rd line in the header box will be red.
|
|
|
|
Progress bar |
Show the progress of the program when parsing directories
|
|
Add cells |
Files can be added to this list in 3 different ways:
Simply drag&drop a CSV file on the interface or use the "From Path" or "From Browser" options.
|
|
From Path |
You can achieve the same results as the drag&drop by specifying the file path in the input line and clicking the "Add from path" button. You can use the folder button on the path line to open a Windows file browser. The selected file's path will then be copies to the input line.
|
|
From Browser |
You can add files with the "CSV Browser" interface.
|
|
Clear List |
Clear the list.
|
|
Header display |
The 3 lines of column headers will be displayed in this box. You can use the horizontal slider to scroll the headers. You can also use the mouse wheel if the cursor is over the header box.
You can "mark" these columns to be either "Index", "Data" or "Class".
The "Index" can be used to help merge files in the database. For example is one file contain the study ID and the Radiomics values derived from these studies, while another file contain the study ID and the matching patient information, specifying the "study ID" as index will ensure that all the information from both files are present in the same rows for each study.
The "Data" columns are the ones used to train and test the AI.
The "Class" column is the one the AI will be trained to predict.
Note:
|
|
Data display
|
You can see all the data cells in this box. You can use the vertical slider to scroll the rows. You can also use the mouse wheel if the cursor is over the data box.
|
|
Status |
The number of columns of the different types along with the number of valid rows available to the AI are displayed here. If some columns or rows are invalid they will also be listed.
Columns can be rejected if the associated values contains a text cell, or if all the associated values are empty, NaN, Multiple or all identical.
Rows are rejected if one of the associated values are text, empty or invalid (NaN or Multiple).
|
|
Exit |
Exit the configuration interface.
|
|
Help |
Display this web page |
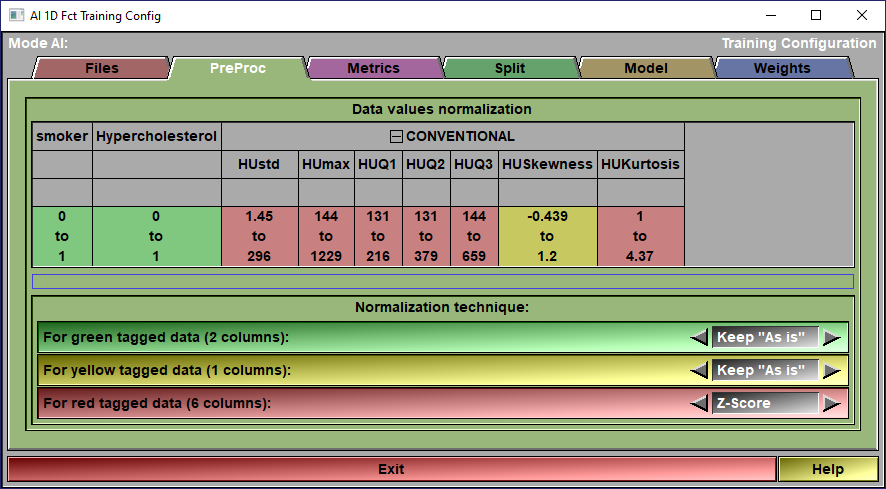
The config "Preproc" page
This page is used to control any pre-processing that need to be applied to the data.
Each data column is assigned one of 3 normalization group: "Green", "Yellow" or "Red".
•Green is for columns whose data minimum values are between -0.25 and 0.25, maximum values are between 0.75 to 1.25 and whose data range cover at least 75% of the 0 to 1 range.
•Yellow is for columns whose data minimum values are between -1.00 and 0.5, maximum values are between 0.5 to 2.0 and whose data range cover at least 50% of the 0 to 1 range.
•Red is for all the remaining columns.
The idea here is that we need the data sent to the AI to be in (or close) to the 0 to 1 range. So, depending on the data in each columns, we may need to normalize the column. If the data is already close to the 0 to 1 range, we can do nothing (green columns), for data close but not exactly within the range (yellow columns), you can chose to either normalize or do nothing, but for the data completely outside (red columns) you will need to select a normalization technique.
|
|
|
Header display
|
In this section, there is one box for each TAG present in the selected images. The title of the box (ex: "Map TAG-1 to") let you know what TAG is being mapped. Each of these can be mapped to a "Class" for the AI.
At first, there is as many classes as there are TAGs in the selected images. But since multiple TAGs can be mapped to the save class, some of the classes can be disabled if no TAG mapped to them. So, if there is a TAG in the images you do not want to use in the AI, just map it to the background.
This mapping is only used for training and testing. When predicting, only the grey values of the image is used.
|
Column normalization
|
Each classes used in the AI can be mapped to a TAG value. Each classes can also be assigned a label. So, for example, if you map "Class 1" to the "TAG-1", when predicting the segmentation of an image, the tissue associated to Class 1 will be tagged in sliceO using TAG-1.
This mapping is only used for predicting and testing.
|
Exit |
Exit the configuration interface.
|
Help |
Display this web page |
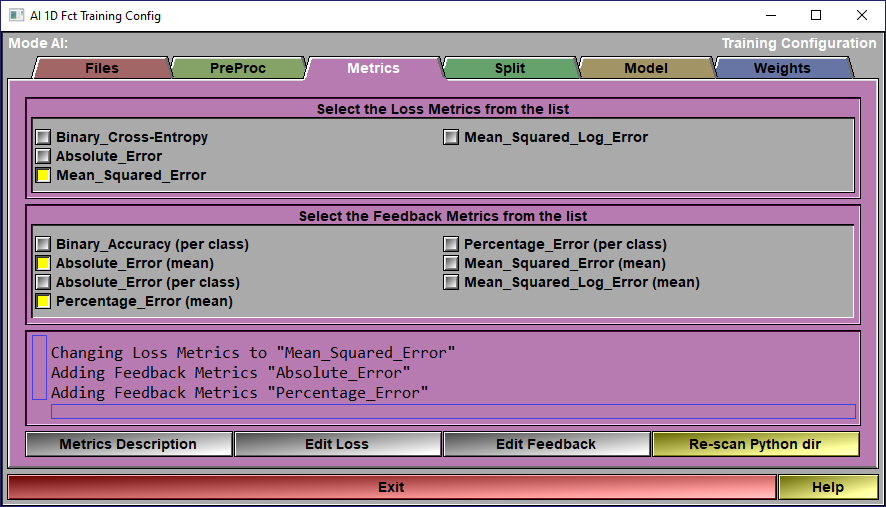
The config "Metrics" page
When you train the AI, 2 sets of "metrics" are used: The Loss Metrics is the one used to compute the AI weights. The other group of metrics are just computed to give you an idea of what is going on. They are only there to provide you some feedback on the accuracy of the AI, they are optional and can be all off if you want.
At this time, you can only have 1 "Loss" metric when training your AI. You can however have as many "Feedback" metrics as you want.
These metrics will be reported back to you when you train your AI. They can also be used when you will select the weights you want to save for your AI. During training you will be presented with 2 graphs: One for the training and validation loss, and one for the training and validation values of the feedback metrics.
Depending on the type of data you want to predict, you will select a model that is either "Categorical" or "float" (more on that subject in the "Model" section of this page). The loss and feedback metrics you select should also depend on your model. For a "categorical" model, you should use the "Categorical_Cross_Entropy" loss and the "Categorical_Accuracy" metric. For float models, I would suggest the "Mean_Squared_Error" loss and the "Absolute_Error" metrics.
For more info on the different loss and metrics functions I suggest reading the web page: "How to Choose Loss Functions When Training Deep Learning Neural Networks"
|
|
|
Loss Metrics |
Select one of the metrics as a "Loss" function to train the AI.
|
Feedback Metrics |
Select any metrics you want from this list to get additional information on the AI training progress.
|
Text Window |
This window reports on the metrics selections and the description of each metrics.
|
Description |
This will cause the description associated with each of the selected metrics to be displayed in the text window.
|
Edit Loss |
The different metrics are all Python files that you can edit if you want. You can also add your own metrics. Just follow the prescribed syntax and add the python file of your new metric in the Python directory. Then click the "re-scan dir" to cause sliceO to re-analyze the directory and add your metrics. The syntax will be described later at the end of this section. |
Edit Feedback |
|
Re-scan dir
|
|
Exit |
Exit the configuration interface.
|
Help |
Display this web page |
The config "Split" page
|
|
|
Testing |
A portion of the data rows you selected in the config "File" page can be reserved for testing.
|
Testing Status |
Report on the number of available data rows
|
Validation |
You have access to 3 validation methods: •Training/Validation Split. Probably the simplest, a part of the available rows (those left after the rows reserved for testing are removed) is reserved for validating the AI at each epoch. The same rows are used for validation at each epoch. •K-Fold Cross-Validation. The available rows are split in "n" groups using the ratio defined in the K-Fold interface. For example if the K-Fold is 1/5, then n=5. We do a complete training of all the epochs reserving the rows of one of these groups validation. We then redo the complete training using another group for validation. We do this n times. After that, we assume that we have a good idea of the validation since by now all the rows have been used for that, we do a last training without any validation. In the "Train Save" page, the graphs will show the mean value of the n+1 pass for training metrics and the n pass with validation for validation metrics. •Leave one out Cross-Validation. This is the extreme case of K-Fold where n is equal to the number of rows.
|
Validation Status |
Report the number of rows that will be used for training and for validation.
|
Exit |
Exit the configuration interface.
|
Help |
Display this web page |

The config "Model" page
In this page, you will select the model you want to use for the AI. The models can be split in 2 groups: The "categorical" models and the "float" models.
The "categorical" models are used to predict either a binary value or are used to class data rows in categories. For binaries values, the class column will have values that are either 1 or 0, for categories, the values will be an integer value representing the different categories (0 to n).
If you want to predict a floating point value, then you should use one of the "float" models.
|
|
|
Model List |
Select a model from the list.
|
Model Feedback |
Information on the selected model will be displayed here.
|
Model Summary |
Call the Keras function "Summary" for the selected model.
|
Edit Model |
The different models are all Python files that you can edit if you want. You can also add your own models. Just follow the prescribed syntax and add the python file of your new model in the Python directory. Then click the "re-scan dir" to cause sliceO to re-analyze the directory and add your model. The syntax will be described later at the end of this section.
|
Re-scan Python dir
|
|
Exit |
Exit the configuration interface.
|
Help |
Display this web page |

The config "Weights" page
|
|
|
Weight List |
This list will display all the available weights for the selected model. Select one of these from the list.
|
Weight Feedback |
Information on the selected weights will be displayed here.
|
Weight Description |
Cause the description of the weights to be displayed in the text window.
|
Edit Description |
The weight description is a text file associated with the weights. It has the same name as the weights but with the ".txt" extension. It can be edited with a simple text editor. If you click "Edit", this file will be opened in Notepad.
|
Re-Scan weights
|
Re-scan the directory if you have saved some new weights for this model. |
Exit |
Exit the configuration interface.
|
Help |
Display this web page |

|
|
|
Text Feedback |
|
Config |
Open the Configuration window
|
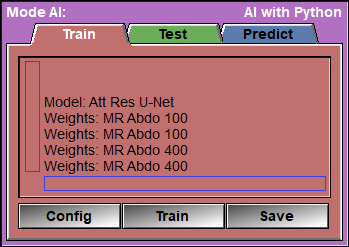
Train
|
Open the "Train" Window. |
Save |
Open the "Save" Window.
|
Once you used the config pages to select the files you want to train on, and you selected the preprocessing steps, the augmentations, the validation split and the model you want to use, you are ready to start training your model to obtain the AI weights.
This is the page that will enable you to train the AI.
The only things that remain for you to select are the learning rate, the number of epochs and the batch size. After that, you click on "Train" and wait (and wait... and wait...) for the results!
Once started, the training will:
For each step:
•Reset or pre-load the weights (if you selected to re-train existing weights).
Then, for each epoch it will:
•Make a scrambled list of the data rows used for training.
•Call the Keras function "train_on_batch" for the batches of training rows (using the scrambled list).
•Call the Keras function "test_on_batch" for the batches of validation rows.
•Report the results of this epoch and possibly save the current weights, the current metrics and a script associated with these to the "AI Temp" folder. We only save a total of 100 weights, so if you have more than 100 eopchs, we will only save weights each (nb_epoch/100) epochs.
The number of "steps" is dependant on the validation technique. A simple Train/Validation split us done in a single step. K-Fold and Leave-one-out cross validation require multiple steps.
Note:
|
|
|
Note:
|
|
|
Note:
|
|
|
|
|
|
Progress Bar |
Report on the training progression.
|
ETA |
Estimated time of completion (computed after each epoch).
|
Step Feedback |
Current step number.
|
Epoch Feedback |
Current Epoch number.
|
Batch Feedback |
Currently processed batch.
|
Text Feedback |
textual information about the training progression.
|
Loss Graphic |
A graphic showing the training and validation loss values as a function of the epochs.
|
Validation Graphic |
A graphic showing the training and validation values of all the selected feedback metrics
|
Learning Rate |
The learning rate used in training the AI. the default value is 0.001
|
Max Epoch |
The number of epoch used for the training.
|
Batch Size |
The number of images used in each training and testing batchs. If the AI failed becuase of a lack of GPU memory, you can decrease this value.
|
Early Stopping |
Optima training is usually achieve when the validation loss stop decreasing. You can enable this option to stop the training automatically when this happen. The "Patience" parameter will let the AI train for a number of additional epochs to make sure we did indeed have achieve the minimum validation loss.
|
Start |
Start the training.
|
Pause/Resume |
You can pause and resume the training.
|
Stop |
Stop the training.
|
Exit |
Exit the "Training" interface.
|
Help |
Display this web page |

After having trained your AI, you want to save the weights you just computed.
When clicking "Save" 4 files will be transferd from the "AI Temp" folder to a sub-directory of the "Python Code" folder. This sub-folder will have the name of the model used for the training (ex: "U-Net", "Att Res U-Net"...). That sub-folder will contain 4 files, they will all have the name you selected but with different extensions:
•The Keras generated weights (with the extension ".data-00000-of-00001"). This file will be big (more than 100Mb).
•The Keras generated index (with the extension ".index"). This file has between 30Kb to 40Kb.
•A sliceOmatic script file containing the training parameters (with the extension ".scp").
•An ASCII "description" file (with the extension ".txt").
Note:
|
|
|
To help you select the optimal epoch for the weights, you have access to plots of the loss and feedback values along with their numerical values.
|
|
|
Epoch Selection |
Select the desired epoch from the list.
|
Name |
Name use for the saved weights. A default value is proposed, but you can change it as you which.
|
Description |
The description associated with the saved weights. Again, a default value is proposed, but you can edit this test to your liking.
|
Epoch Feedback |
Numerical values of the different metrics at the end of the selected epoch.
|
Loss Graphic |
Plot of the training and validation loss as a function of the epochs. The yellow vertical bar represent the selected epoch. You can also select the epoch to save by clicking at the desired location in the graphic window
|
Validation Graphic |
Plot of the training and validation feedback metrics as a function of the epochs. The yellow vertical bar represent the selected epoch. You can also select the epoch to save by clicking at the desired location in the graphic window
|
Save |
Save the selected weights to the model's sub-folder.
|
Exit |
Exit the "Save" interface.
|
Help |
Display this web page |

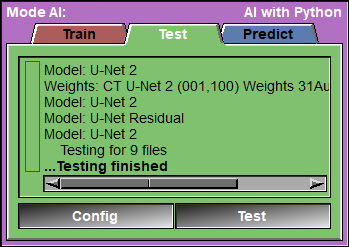
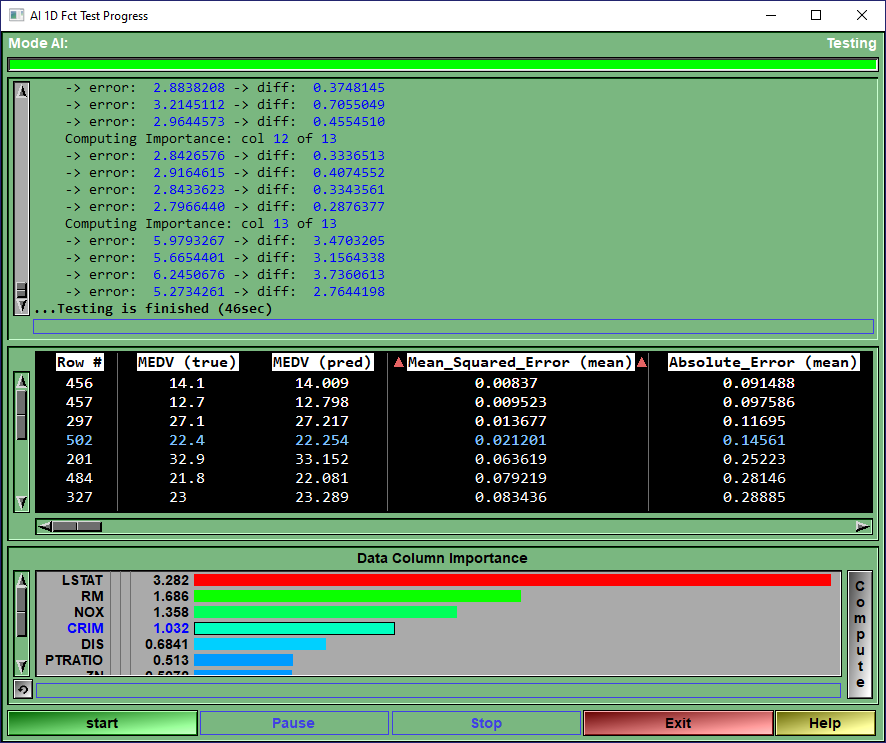
This page is used to test your AI against a reserved portion of the selected rows.
The program will go through all the "test" rows, and call the Keras "test_on_batch" function for each of them. It will report the different metrics for each rows and once all the rows are tested, compute the mean and standard deviation of each of the metrics.
These results will also be saved in a Excel compatible file in the AI_Temp directory.
|
|
|
Text Feedback |
|
Config |
Open the Configuartion window
|
Test |
Open the "Test Progress" Window.
|
The results for each row will be presented in a table. You can sort this table according to any of its column (just click on the column header). You can also highlight a specific row of values by clicking on it.
You can also compute the "Column Importance" for the AI.
Technical Note:
|
|
|
The results of this computation can be viewed in "Header" form, with the numerical value for each column. The back ground color of each of these cells use a "hot metal" color table, with lowest values in cold blue and highest values in hot red.
The "rotation" button at the bottom left corner of the "Data Column Importance" interface can also be used to change the display to a bar graph with the colums sorted by decreasing importances.
|
|
|
|
|
Importance computation results in "Header" form
|
|
|
|
|
|
Importance computation results in bar graph form |


|
|
|
Progress Bar |
Show the progression of the testing
|
Text window |
Report on the metrics for each image and the mean values.
|
Results table
|
Once the testing is done, this box will display the numerical results of the different metrics for each rows. The results can be sorted acoording to any of the columns. Just click on the desired column to change the sort order.
You can highlight a row by clicking on it.
|
Data Column Importance |
Clicking on the "Compute" button will cause the program to compute the "Permutation importance" of all the "data" columns. The results will then be displayed either as a header column table, with the importance value of each column displayed as a 4th row, as numerical value and with color from a "hot metal" color scheme, or as a bar graph of sorted importances. You can toggle between these display modes using the "rotate" button on the bottom left corner of the "Data Column Importance" section.
You can highlight a specific "data" column by clicking on it. This selection will be preserved if you change display modes.
|
Start |
Start the computation of the tests.
|
Pause/Resume |
Pause/resume the computation.
|
Stop |
Stop the computation.
|
Exit |
Exit this page.
|
Help |
Display this web page |
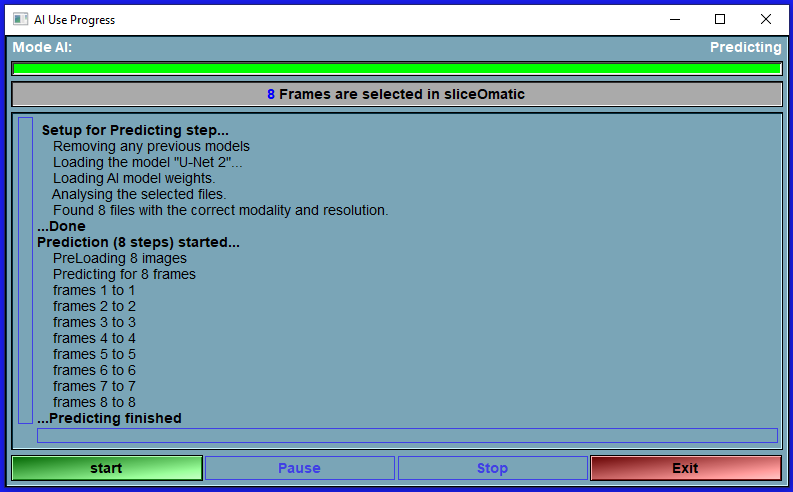
The Predict page
This is the page where the magic happens!
From the AI list, select the AI you want to use. Alternatively, you can use the Config page to select a model and its assciated weights.
All the valid rows of the 1D CSv database loaded in sliceOmatic will then be used to "predict" the desired column when you press the "Compute" button. If your loaded databse does not have a column matching the "class" column of the AI trained model, that column will be created and filled by the program. If the column already exit, its cells will be overwritten by the program.
|
|
|
AI Selection |
Select the desired AI from the list. This will automatically set the Model and the associated Weights.
|
Rename |
Rename the files associated with the selected AI (script, text and AI weights).
|
Delete |
Delete the files associated with the selected AI.
|
Config |
Open the Configuration window
|
Compute |
Open the "Predict Progress" Window.
|
|
|
|
Progress Bar |
Show the progression of the predicting
|
Text Feedback |
Report some info on the progression of the prediction.
|
Start |
Start the computation of the prediction.
|
Pause/Resume |
Pause/resume the computation.
|
Stop |
Stop the computation.
|
Exit |
Exit this page. |
The Python files
You can add your own metrics and models to this mode. You just have to follow the syntax described here:
The Python directory.
All the Python files used by sliceOmatic's AI module are stored in the Python directory. By default this is in "Documents\SliceO_Python". The location of this directory can be changed through the sliceOmatic's "Config" interface.
The Metrics Python files.
For my metrics files, I use names that start with "metrics ", but the name is not really important. What is important is that the file contain either a "metrics_1D_Fct" function, a "loss_1D_Fct" function or both.
You can have 3 types of metrics functions
The "Loss" metrics:
- The Loss functions compute a loss metrics used to train the AI.
The value of the loss function must decrease when we are approach perfect results.
The name of the loss function must be: "loss_1D_Fct" and have 2 arguments: "y_true" and "y_pred", 2 tensors, as described in Keras doc.
You must define a flag for the function: loss_1D_Fct.flag =... (The choices are between: "mean" "weighted" and "class" )
You must define the name of the function: loss_1D_Fct.__name__ =...
You must define a version for the function: loss_1D_Fct.__version__ =... (The version syntax is: "major.minor". ex: "2.3")
You must define the description of the function: loss_1D_Fct.description =...
|
|
import keras as kr
def loss_1D_Fct( y_true, y_pred ) : # --- We simply call the Keras function --- return( kr.losses.mean_squared_error( y_true, y_pred ) )
# ---------------------------------------------------- # Give a name for this metrics # ---------------------------------------------------- loss_1D_Fct.__name__ = "Mean_Squared_Error"
# ---------------------------------------------------- # Give a version for this metrics # ---------------------------------------------------- loss_1D_Fct.__version__ = "2.0"
# ---------------------------------------------------- # Give a name for this metrics # ---------------------------------------------------- loss_1D_Fct.description = "Call the Keras \"mean_squared_error\" function:\n" \ "Computes the mean of squares of errors between labels and predictions." |
You can have 2 types of metrics: "global" or "Per class".
The "global" metrics:
- The Metrics functions compute a metrics used as feedback when training or testing.
The name of the metrics function must be: "metrics_1D_Fct" and have 2 arguments: "y_true" and "y_pred", 2 tensors, (as described in Keras doc.)
You must define a flag for the function: metrics_1D_Fct.flag =... (The choices are between: "mean" "weighted" and "class" )
You must define the name of the function: metrics_1D_Fct.__name__ =...
You must define a version for the function: metrics_1D_Fct.__version__ =... (The version syntax is: "major.minor". ex: "2.3")
You must define the description of the function: metrics_1D_Fct.description =...
|
|
|
The "per class" metric:
The name of the metrics function must be: "metrics_1D_Fct" and have 2 arguments: "class_idx" and "name", the index and name of the target class, for "Per class" metrics.
The "per class" metrics return a "global" metric function for the desired class.
You must define the name of the function: metrics_1D_Fct.__name__ =...
You must define a version for the function: metrics_1D_Fct.__version__ =... (The version syntax is: "major.minor". ex: "2.3")
You must define the description of the function: metrics_1D_Fct.description =...
You must also define a "flag" that must contain the string "class". (metrics_1D_Fct.flag = "class")
|
|
|
The Model Python files.
Again, I use the prefix "model " for my models files but the name is no important. The important is that the file contain a "model_1D_Fct" function.
That function receive 4 arguments: dim_x, dim_y, dim_z and num_classes. dim_x is the number of column used to train this model with and num_classes is the number of classes. The "dim_y" and "dim_z" argument is not used in 1D models. The function must define the layers of your model and return the "model" variable returned by the Keras "Model" function.
You must define the name of the function: model_1D_Fct.__name__ =...
You must define a version for the function: model_1D_Fct.__version__ =... (The version syntax is: "major.minor". ex: "2.3")
You must define the description of the function: model_1D_Fct.description =...
|
|
|
The Test Python files.
By default, I test for the presence of Python, Numpy, Tensorflow and Keras. If you use another module in your Python code, you can add a new test file. SliceO will use this to test that the desired module is indeed loaded when it start the AI module.
The file must contain a "version" function that return the version number for the target module.
It must also contain a "__name__" definition.
|
|
|
Accessing sliceOmatic variables from Python.
You can access any of the sliceOmatic variables from your python code.
The functions for this are:
sliceO_Var_Get_Int( Variable_Name )
sliceO_Var_Get_Float( Variable_Name )
sliceO_Var_Get_Str( Variable_Name )
return one (or an array of) value(s), depending on the variable.
sliceO_Var_Set_Int( Variable_Name, Value )
sliceO_Var_Set_Float( Variable_Name, Value )
sliceO_Var_Set_Str( Variable_Name, Value )
Assign the value "Value" to the variable "Var_Name". At this time only variable with one value can be "Set" (no arrays).
From the Display Area
There is no display area interaction specific to this mode.
From the Keyboard
There is no keyboard interface specific to this mode.
From the Command Line
System Variables defined in this library:
|
|
$AI_RES_X |
(I16) |
|
|
|
$AI_RES_Y |
(I16) |
|
|
|
$AI_RES_Z |
(I16) |
|
|
|
$AI_CLASS_NB |
(I16) |
|
|
|
$AI_CLASS_LABEL |
A(W) |
* $AI_CLASS_NB |
|
|
$AI_CLASS_RATIO |
A(F32) |
* $AI_CLASS_NB |
|
|
$AI_CLASS_WEIGHTS |
A(F32) |
* $AI_CLASS_NB |
Importance computation:
|
|
$AI_IMP_BATCH |
(I32) |
Number of rows in each batch computation (def=1) |
|
|
$AI_IMP_REPEAT |
(I32) |
Number of computation done to compute the mean value (def=4) |
Training Parameters:
|
|
$AI_TRAIN_STEP_MAX |
(I32) |
|
|
|
$AI_TRAIN_STEP_CUR |
(I32) |
|
|
|
$AI_TRAIN_EPOCH_MAX |
(I32) |
|
|
|
$AI_TRAIN_EPOCH_CUR |
(I32) |
|
|
|
$AI_TRAIN_BATCH_MAX |
(I32) |
|
|
|
$AI_TRAIN_BATCH_CUR |
(I32) |
|
|
|
$AI_TRAIN_LR |
(F32) |
|
|
|
$AI_TRAIN_EARLY_FLAG |
(I32) |
|
|
|
$AI_TRAIN_EARLY_NB |
(I32) |
|
Python Variables:
|
|
$PYTHON_FLAG |
(U32) |
|
|
|
$PYTHON_MODULE_PATH |
(W) |
|
|
|
$PYTHON_INTERPRETER_PATH |
(W) |
|
|
|
$PYTHON_SLICEO |
(P) |
|
|
|
$PYTHON_TEMP |
(W) |
|
Commands recognized in this mode:
Python: path "path"
Python: temp "path"
A1F: file read "path"
A1F: file "path" (on|off)
A1F: class nb value
A1F: class label id "label"
A1F: data nb value
A1F: data label id "label"
A1F: data norm id a b id
A1F: index nb value
A1F: index label id "label"
A1F: metrics loss "name"
A1F: metrics feedback clear
A1F: metrics feedback "name"
A1F: split test value
A1F: split mode value
A1F: split split value
A1F: split kfold value
A1F: model cur "name"
A1F: model modality value
A1F: weights cur "name"
A1F: weights load