What is the Alberta Protocol 2.0
The idea here is to offer a simplified interface and helpful guidelines for users who which to analyze 1 CT slice at L3.
This protocol was developed by researchers at the university of Alberta. They conceived a protocol along with a training course to insure uniform segmentation from all the people participating in their studies and they graciously agreed to let us, at TomoVision, incorporate this protocol in our product.
The Alberta Protocol will guide you through the steps necessary to measure the surfaces of muscle and 3 types of fat in a specific CT slice. These steps are:
•Reading the files in sliceOmatic.
•Selecting the slice at L3.
•Segmenting the tissues in that slice.
•Exporting the results of the segmentation.
The 3rd step: "Segmenting the tissues" can now be acomplished automatically with the AI module. So, the 3rd step will have 2 buttons: the automatic segmentation using the AI module, and the old "Manual" step in case the automatic segmentation did any errors that you want to correct.
The Interface
|
|
Once activated, either by starting the program through the "Alberta Protocol" shortcut, or with the configuration interface, the "Modes" menu will have a new group of 5 buttons. Each of these buttons will be associated with one of the protocol's steps.
Clicking on one of these buttons will open a the matching help page to guide you through the actions required for that step. It will also set the modes, tools and windows of the sliceOmatic interface to facilitate these actions.
Once you are familiar enough with the protocol, you can disable the opening of the help pages with the configuration interface. |
|

Note:
|
|
The matching help page is only opened once per session for each button. If you desired to see the help page again, just press "F12" while the cursor is over the desired menu button.. |
|
The Mechanic
|
|
Starting the "Alberta Protocol" form the shortcut:
The "Alberta Protocol" simplified menu can be activated by starting the program with the "Alberta Protocol" shortcut. If the shortcut is not on your desktop, it can be found in sliceOmatic's installation directory (by default: c:\Program Files\TomoVision).
Using the "Alberta Protocol" shortcut will start sliceOmatic with 2 command line arguments: -s "Sarcopenia" -n "Alberta Protocol"
Having the "-s" command line argument set the following system variables: •$INTERFACE_FLAG will be set to 3, meaning the simplified menus and the associated help pages are on. •$INTERFACE_ROOT will be set to "Sarcopenia", meaning that the simplified menus will be associated with the script files found in the Sarcopenia sub-directory of the installation directory.
Having the "-n" command line argument set the following system variables: •$INTERFACE_NAME will be set to "Alberta Protocol", meaning the name of the new group of buttons in the Mode menu will be "Alberta Protocol". |
|

|
|
Starting the "Alberta Protocol" from the configuration interface:
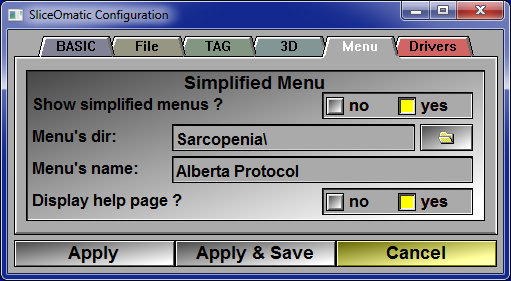
You can also enable the protocol by setting the values of the "Menu" page in the configuration interface. Once this is done, if you click "Apply & Save", not only will you enable the simplified menus, but it will be enabled each time you re-start the program, even if you do not do it from the ""Alberta Protocol" shortcut.
•You can enable/disable the new menu group with the "Show simplified menus?" choice.
•The sub-directory containing the protocol's script is specified with the "Menu's dir" line.
•The name of the new menu group is given by the "Menu's name" line.
•You can enable/disable the new menu group with the "Display help page?" choice.
If you save the configuration, then the "sliceOmatic_ini.scp" will contain the matching commands in the "Menu" section. |
|
|
|
Starting the "Alberta Protocol" from the configuration file:
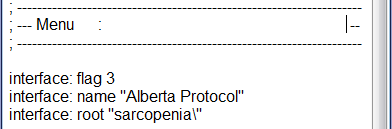
The configuration file has 3 commands controlling the simplified menu interface:
interface: flag value Where value is a bit flag, with bit 0x01 controlling the presence of the simplified menu, and bit 0x02 the opening of the help page associated with each buttons.
interface: name menu_name Where "menu name" is the name associated with the new mode group. This name will be copied to the $INTERFACE_NAME variable
interface: root dir_name Where "dir_name" is the directory containing the scripts associated with the new menu buttons. This directory's name will be copied to the $INTERFACE_ROOT variable.
|
|
The "step_x" scripts:
The $INTERFACE_ROOT directory contain the script files that will be used in the simplified interface. These scripts are named "step_x.scp", with x going from 1 to n. There will be 1 menu button per consecutive step script in the directory, starting with step 1.
Each of these scripts will set the program's interface to help the user in the task specific to that step.
There are 2 commands in these scripts that are unique only to the simplified menu interface: The "name" and the "html" commands.
•The "name" command give the name of the button (this will be appended to the "step_x" name). for example, if step_1.scp contain the command "name: "Read the files"", then the first button of the new mode group will be called "step 1: Read the files".
•The "html" command give the address of a web page associated with the button. If the configuration parameter "Display help page?" has not been set to off, the associated web page will be open once when each menu button is pressed.
The Step_0.scp script is a special case. It is not associated with a button in the Modes menu, instead it is executed at startup.