3D


Voxel per Gb

The program will attempt to keep the size of the 3D model small enough to fit in the GPU memory of your graphic card.  It does that by capping the number of voxel it allow in your model.  This cap is function of the amount of GPU memory.  If you get a memory problem while using the software you can decrease this cap here.  Inversely, if you think your model are to degraded, you can attempt to increase it. 


Mouse Motion

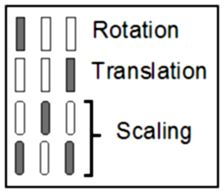
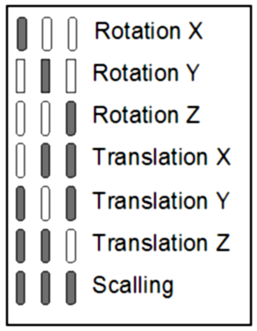
In the 3D window, the mouse can be used to perform rotation, translation and scaling  of the objects. Baby SliceO gives you a choice of 3 interaction modes:


Trackball:  The left mouse button activates the trackball rotations. The mouse controls a point on the surface of a sphere anchored in the center of the 3D window. Moving the mouse drags the point and thus rotates the sphere around its center. The right mouse button activates the translations. The mouse motion drags the objects vertically and horizontally in the plane of the 3D window. The middle mouse button (or both the left and right) activates the scaling. The horizontal mouse motion controls the objects’ scaling.


Classic:  The left mouse button activates the rotations. The vertical mouse motion will rotate the objects around the windows’ horizontal axis. The horizontal mouse motion will rotate the objects around the window’s vertical axis. The right mouse button activates the translations. The mouse motion drags the objects vertically and horizontally in the plane of the 3D window. The middle mouse button (or both the left and right) activates the scaling. The horizontal mouse motion controls the objects’ scaling.


Patient Axis:  In this interface mode, only the horizontal mouse motion is used, and all transformations are done in the patient axis system. Thus, a “z” rotation is a rotation around the patient’s head to foot axis. Each of the mouse buttons controls the rotation of the objects around one of the patient’s axis. The left button activates the “x” axis rotation, the middle button the “y” axis rotation and the right button the “z” axis. Each combination of 2 buttons controls the translation of the objects along one of the patient’s axis. The middle and right buttons activate the “x” translation, the left and right buttons the “y” translation and the left and middle buttons the “z” translation. Pressing all 3 mouse buttons at once activates the scaling.


By default the “Trackball” interface is selected.


3D Overlays

Even though these items are not exactly overlays, they are added on the 3D image and can be turned On or Off. You can also control these items with the “F9" and “F10" keys. By default the “Axis” and “Bounding Box” graphics are enabled.


Global Axis: This enables a 3D axis system in the bottom left corner of the window. The axises are in the patient coordinates system.


Reslice Box: The contour of the reslice volume is displayed..


Original Box: The exterior lines of the box containing all the images are drawn in white.


Slice Contour: A white contour line is drawn around each image. This overlay can be combined with the Bounding Box.


Center Geom

By default, the location of the 3D model is derived from the original voxels positions in 3D space.  With this option, you can have the 3D model centred around 0.


Share TAG

If you have a multi-frame file, you can share the TAG mask among these frames.  In other words, the voxels you mask out in one frame will also be masked out in the other frames.